I2C bus basics
As discussed during the lecture, I2C is a digital bus that supports data exchange with multiple slave devices over two signals - clock and data.
The typical Arduino pinout is A4 for data (SDA) and A5 for clock (SCL). To have multiple devices in the system, each of them has to have a different address, up to 127 different addresses are possible (7 bits).
To avoid conflicts - usually digital devices with I2C bus have some way of switching their address, either over the I2C bus itself, or
I2C scanner code
#include <Arduino.h>
#include <Wire.h>

void setup()
{
  Wire.begin();
  Serial.begin(9600);
}

void loop()
{
  Serial.println("Scanning...");

  for(uint8_t address = 1; address < 127; address++ )
  {
    Wire.beginTransmission(address);
    uint8_t error = Wire.endTransmission();
    if(!error){
      Serial.print("I2C device found at: 0x");
      if(address<16) Serial.print("0");
      Serial.println(address, HEX);
    }
  }
  delay(3000);
}
Connecting an OLED display to I2C bus
Let’s plug the OLED display to the I2C bus. Usually for safety I try first with 3.3V voltage supply for digital modules that I don’t know if they accept 5V. Hence the wiring will be:
- OLED
SDA-A4 - OLED
SCL-A5 - OLED
VCC-3V3 - OLED
GND-GND
Let’s observe the console output and note the address where the display has been found on the bus:
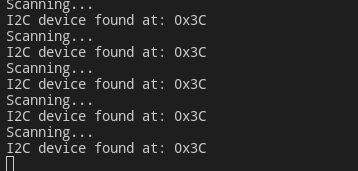
Most likely the address will be 0x3C.
In case you’re getting no output - double check your wiring. A common thing as well is that some I2C modules don’t include the required pull-up resistors. In that case you would need to connect additional 4.7k-10k ohm resistors between the SDA, SCL and 3V3.
I2C OLED library
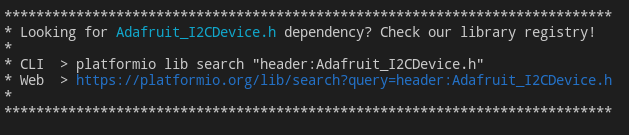
This specific OLED (and many displays available on the market) is using an SSD1306 driver inside. Thus, let’s find a library that can support SSD1306. A commonly used one is one from Adafruit: https://platformio.org/lib/show/135/Adafruit%20SSD1306
Let’s install that library and try the simplest example.
#include <Arduino.h>
#include <Wire.h>
#include <Adafruit_GFX.h>
#include <Adafruit_SSD1306.h>

#define SCREEN_ADDRESS 0x3C
Adafruit_SSD1306 display(128, 32, &Wire, -1);

void setup()
{
  Wire.begin();
  Serial.begin(9600);

  display.begin(SSD1306_SWITCHCAPVCC, SCREEN_ADDRESS);

  display.clearDisplay();
  display.drawPixel(10, 10, SSD1306_WHITE);
  display.display();
}

void loop()
{

}
Build, upload & verify…
Actually, let’s add one more required library - it is fairly common that some libraries require other libraries with some common utils like hardware abstraction.
You will need to update your platformio.ini to include both:
lib_deps =
    adafruit/Adafruit SSD1306 @ ^2.5.0
    adafruit/Adafruit BusIO @ ^1.9.8
Build, upload & verify… Now you should see adafruit logo as a splash screen and then a single dot displayed on the screen.
Displaying meaningful data on the OLED
Let’s try now ti fill out the display with some useful data.
The starting point will be slightly cleaned up previous example:
#include <Arduino.h>
#include <Wire.h>
#include <Adafruit_GFX.h>
#include <Adafruit_SSD1306.h>

#define SCREEN_ADDRESS 0x3C
Adafruit_SSD1306 display(128, 32, &Wire, -1);

void setup()
{
  Wire.begin();
  Serial.begin(9600);

  display.begin(SSD1306_SWITCHCAPVCC, SCREEN_ADDRESS);

  display.clearDisplay();
  display.display();
}

void loop()
{

}
Now let’s pretend that we have some sensor data in two variables - you can add them somewhere to the code.
float temperature = 20.2;
float humidity = 44;
Let’s write a function that will display that data on the display.
void displayEnvData(){
  display.clearDisplay();
  display.setTextColor(SSD1306_WHITE);
  /* YOUR CODE

  */
  display.display();
}
You might want to make use of any combination of:
display.setTextSize(2);- to make the font largerdisplay.print("text");- to display some text or variable on the displaydisplay.setCursor(0,0);- to move the starting point of the text
To manage the text you have two options:
- just calling
display.print()multiple times - first assembling a proper string using
sprintf
To use sprintf you will need to do the following:
char text[30] = {0}; // allocate an array with a size bigger than maximum text you plan to use
sprintf(text, "temp: %f*C humidity: %f%", temperature, humidity);
Unfortunately you will find out that Arduino sprintf implementation doesn’t support floating point numbers and you will get ? rather than proper numbers.
To address that you will need to use dtostrf function.
You could do something like:
char bufferTemp[8] = {0};
dtostrf(temperature, 2, 2, bufferTemp);
sprintf(text, "temp: %s*C", bufferTemp);
Anyhow - create a simple miniature dashboard with temperature & humidity on the OLED display.
You can refer to the Adafruit example for more useful API like drawing lines, rectangles etc to make your dashboard more interesting. https://github.com/adafruit/Adafruit_SSD1306/blob/master/examples/ssd1306_128x32_i2c/ssd1306_128x32_i2c.ino
OneWire bus and a DHT11 sensor
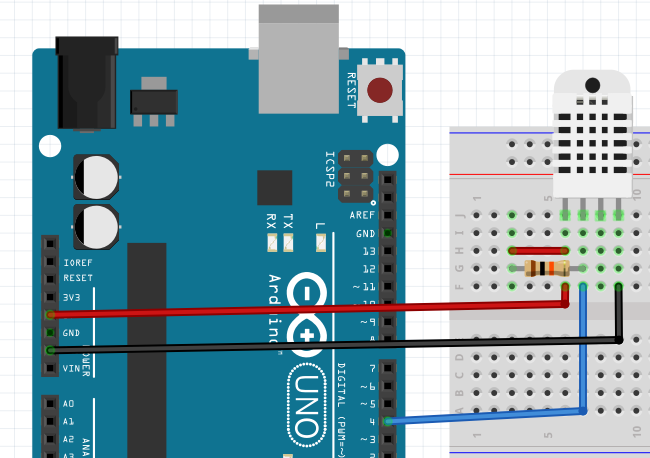
As you might have already guessed, now it’s the time to add an actual temperature&humidity sensor. One that you should have available is the DHT11 sensor that communicates over an OneWire interface.
Let’s plug it in to our Arduino board. It is powered with 5V, and requires a single dignal pin connected to any digital GPIO, let’s use pin number 4 as an example. Please note the pull-up resistor required on the data pin.
As usual, we will need to find a right library for the sensor. Let’s try to use the DHT sensor library from Adafruit.
Install the library adding adafruit/DHT sensor library @ ^1.4.3 to your lib_deps.
Let’s start add to your project the following:
Required includes
#include <Adafruit_Sensor.h>
#include <DHT.h>
#include <DHT_U.h>
Object definition:
DHT_Unified dht(4, DHT11);
In the setup function add:
dht.begin();
And then in the loop you can try reading the data from the sensor
void loop()
{
  sensors_event_t event;
  dht.temperature().getEvent(&event);

  Serial.print("Temperature: ");
  Serial.print(event.temperature);
  Serial.println("°C");

  dht.humidity().getEvent(&event);

  Serial.print("Humidity: ");
  Serial.print(event.relative_humidity);
  Serial.println("%");

  delay(1000);
}
Build, upload & verify.
Afterwards you should be able to update your displayEnvData() function with something similar to:
sensors_event_t event;
dht.temperature().getEvent(&event);
temperature = event.temperature;
dht.humidity().getEvent(&event);
humidity = event.relative_humidity;
Next steps
Now let’s continue and learn about working with UART output