UART communication - receiving UART data
Let’s learn how to parse UART data in different ways.
Reading UART in the main program loop
You can just add a simplest possible example to your loop. In that case if there is any data available in the UART buffer, it will be read and printed back to UART.
void loop()
{
  if (Serial.available() > 0) {
    char character = Serial.read();
    Serial.print("received: ");
    Serial.println(character);
  }
}
Handling UART input as an interrupt
Not to block your main code loop - you can define a special function serialEvent that will be called every time there is some data waiting on UART to be handled.
void serialEvent(){
  if (Serial.available() > 0) {
    char character = Serial.read();
    Serial.print("received: ");
    Serial.println(character);
  }
}

void loop()
{

}
Copare the behaviour - it should be pretty much the same as with the serial read in the main loop. The biggest upside is though that you will not block the main code loop that could have some logic important for your use case not to be interrupted.
Reading complete lines
Rather than reading single characters from UART you might be interested in reading complete lines of data. There is a Serial.readString() function available for that.
Try code like this.
void serialEvent(){
  if (Serial.available() > 0) {
    String line = Serial.readString();
    Serial.print("received: ");
    Serial.println(line);
  }
}
But let’s combine it with something time-sensitive in the main loop. For example just a simple quick blink.
void loop()
{
  digitalWrite(13, HIGH);
  delay(200);
  digitalWrite(13, LOW);
  delay(200);
}
Don’t forget about declaring the pin as output.
Build, upload and observe what happens when you send some data in the terminal, but don’t press enter (finish a line).
You should see that readString is blocking the code for a second or so, before it assumes it’s the end of the input.
A wiser way to go about it is to read single characters until you see a new line character.
String inputString = "";
void serialEvent(){
  if (Serial.available() > 0) {
    char character = Serial.read();
    inputString += character;
    if(character == '\n'){
        Serial.print("received: ");
        Serial.println(inputString);
        inputString = "";
    }
  }
}
This way your UART reading should not interfere with anything happening in the loop.
Making decisions based on the UART input
Depending on the use-case you might need different ways of decision-making based on the UART input. A simple example would be that if you were building a robot, and you wanted to control it movement with single button presses, you could try something like this:
void serialEvent(){
  if (Serial.available() > 0) {
    char character = Serial.read();
    switch(character) {
        case 'w':
          Serial.println("UP!");
        break;
        case 's':
          Serial.println("DOWN!");
        break;
        case 'a':
          Serial.println("LEFT!");
        break;
        case 'd':
          Serial.println("RIGHT!");
        break;
    }
  }
}
Of course, rather than Serial prints, you would call some specific functions, or regulate some parameters.
Remember that switch-case supports multiple cases with the same action. So if you wanted to support both lowercase and uppercase characters:
void serialEvent(){
  if (Serial.available() > 0) {
    char character = Serial.read();
    switch(charac
    ter) {
        case 'w':
        case 'W':
          Serial.println("UP!");
        break;

        case 's':
        case 'S':
          Serial.println("DOWN!");
        break;

        case 'a':
        case 'A':
          Serial.println("LEFT!");
        break;

        case 'd':
        case 'D':
          Serial.println("RIGHT!");
        break;
    }
  }
}
Advanced parameters parsing
It’s often the case that you need to fine-tune some process over UART, to control eg some speeds, angles, thresholds etc.
The simplest way would be to send some data as a string, there could be two approaches to this.
Sending data one parameter at a time with header
You could assume that you will always send the configuration with a single byte header.
For example T<number> would set some temperature threshold.
Then you could do something like this:
String inputString = "";
void serialEvent(){
  if (Serial.available() > 0) {
    char character = Serial.read();
    inputString += character;
    if(character == '\n'){
        Serial.print("received: ");
        Serial.println(inputString);

        switch(inputString[0]){
            case 'T':
                float tempThreshold = inputString.substring(1).toFloat();
                Serial.print("setting temperature threshold to: ");
                Serial.println(tempThreshold);
            break;
        }

        inputString = "";
    }
  }
}
Note the inputString.substring(1).toFloat(); that does two operations at once.
inputString.substring(1) returns a string omitting the first character. So for example when you send T123.1 it will return 123.1.
Then .toFloat() will convert the string to a float value, so you could use it in your code.
Beware of unexpected behaviour if you send the data in incorrect format.
Question how would you protect your code from sending garbage data (for example Text rather than some numberic value). Observe the behaviour and figure out a code-level solution.
UART output - data logging
Similarly to configuring the arduino over UART you might want to log some sensor/input data from the device to your computer/phone.
In such case I would recommend comma-separated format to do this. You could simply go ahead and output any data over UART with commas between, and a new line at the end.
For example:
Serial.print(temperature);
Serial.print(",");
Serial.print(humidity);
Serial.print(",");
Serial.print(buttonStatus);
Serial.println();
This way - it will be easy to manipulate that data in excel etc.
Try to gather the DHT11 data with one-second resolution and plot it in any tool of your choice.
Bluetooth adapter - HC-05
You can extend UART to a bluetooth connection. Let’s wire in the bluetooth adapter to the Arduino UART port.
It’s one of these examples where officially the TTL logic levels should be at 3.3V, but it should do with 5V just fine.
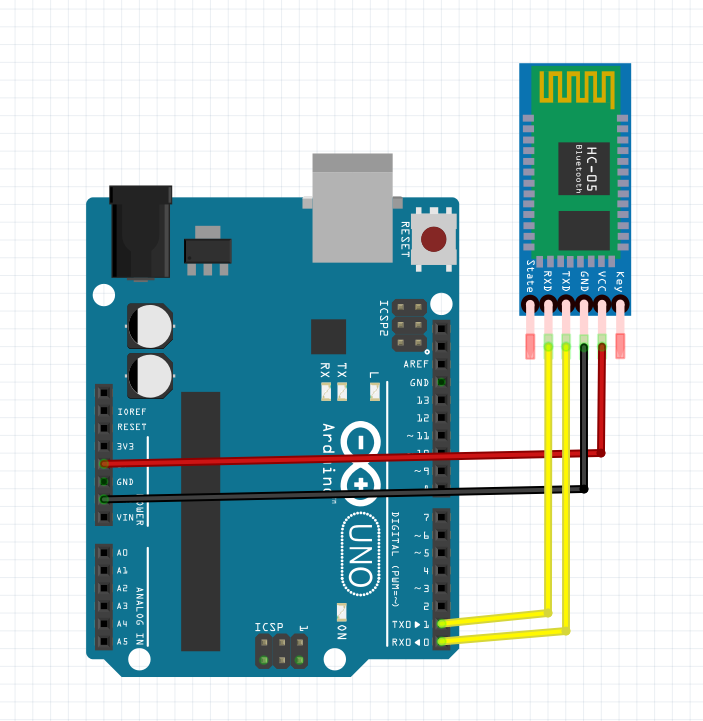
Let’s leave the previous code running on the board.
NOTE please sync up with other participants, so only one person at a time is pairing with the HC-05, otherwise it will be quite difficult to figure out which one is which.
The idea is to only power up a single HC-05 at a time.
You can then pair the module with your phone as any other bluetooth classic device. The default PIN is 1234.
After pairing, let’s search for a Serial Bluetooth Terminal app on Android Play Store.
When you open it up, you should be able to connect to the bluetooth adapter and if you type any text, you should be getting responses.
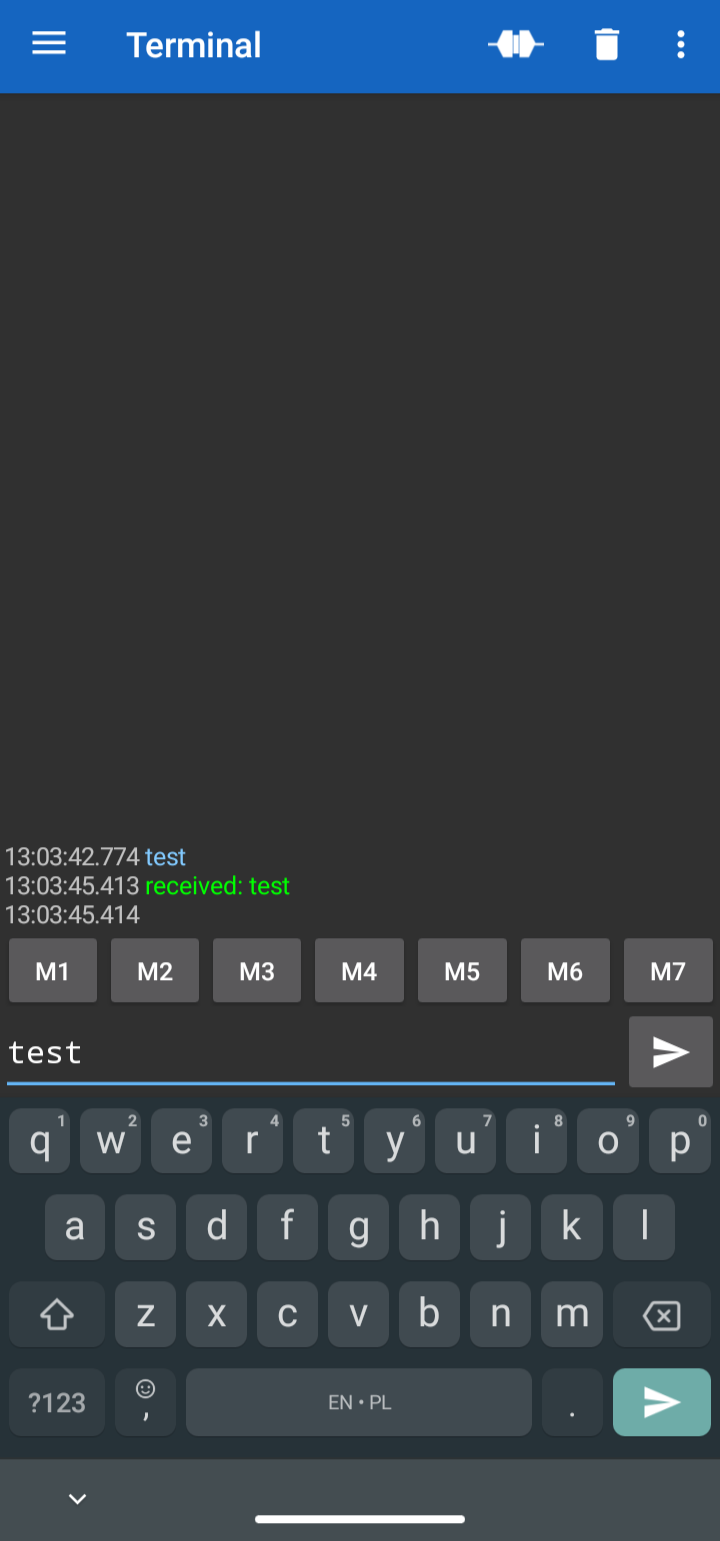
You could use such link to:
- remotely tune parameters of some process (eg motor speed, servo angles etc)
- gather sensor data
- control a device live (eg. open up a door etc)
Next steps
Now we can move forward to working with an alternative arduino board with WiFi